Offer Times guide
How to install Offer Times, share your availability, take bookings, connect an integration — and how to disconnect or remove anything you’ve connected.
What Offer Times is
Offer Times is a browser extension for Google Calendar and Outlook on the Web. You select open slots directly on your calendar and it turns them into clean, readable text you can paste into an email, a text message, WhatsApp, LinkedIn or Slack — so you can offer a few times in your own words instead of sending a scheduling link.
If you’d rather let people pick a time themselves, you can also turn on a personal booking link (offer-times.com/yourname). Bookings made through that link become real calendar invites, and if the guest chooses to meet over video, a meeting link is added to the invite automatically.
Requirements
- A supported browser — Chrome (and Chromium browsers such as Arc and Edge) or Firefox. Offer Times is a browser extension, so it does not run in a desktop mail or calendar app.
- A calendar in the browser — Google Calendar, the Google Calendar side panel in Gmail, or Outlook on the Web.
- An Offer Times account — only needed for features that touch your calendar or your booking link. Copying times works without signing in.
- Google Calendar connected — required for holds, and for Offer Times to create the calendar invite when someone books you.
- A Zoom account — only if you want Zoom to be the video option on your bookings. Any Zoom plan that lets you create meetings works.
Install and sign in
- Install the extension from the Chrome Web Store or Firefox Add-ons.
- Open Google Calendar and refresh the page.
- Click the Offer times button in the bottom right of your calendar. In Gmail, open the Google Calendar side panel and look for the same button at the bottom of the panel.
- Click Sign in in the panel and continue with Google, or choose “Use your email instead” to get a 6-digit code by email.
If the button never appears, your organization may be blocking browser extensions on Google sites. The FAQ has a step-by-step check and a message you can send to IT.
Offering times
- Open the Offer Times panel from your calendar.
- Click or drag on the calendar grid to select the slots you want to offer. Selected slots appear in the panel as you go.
- Press Copy to put the formatted text on your clipboard, or Email to start a message with the times already in it.
- Paste wherever you’re writing.
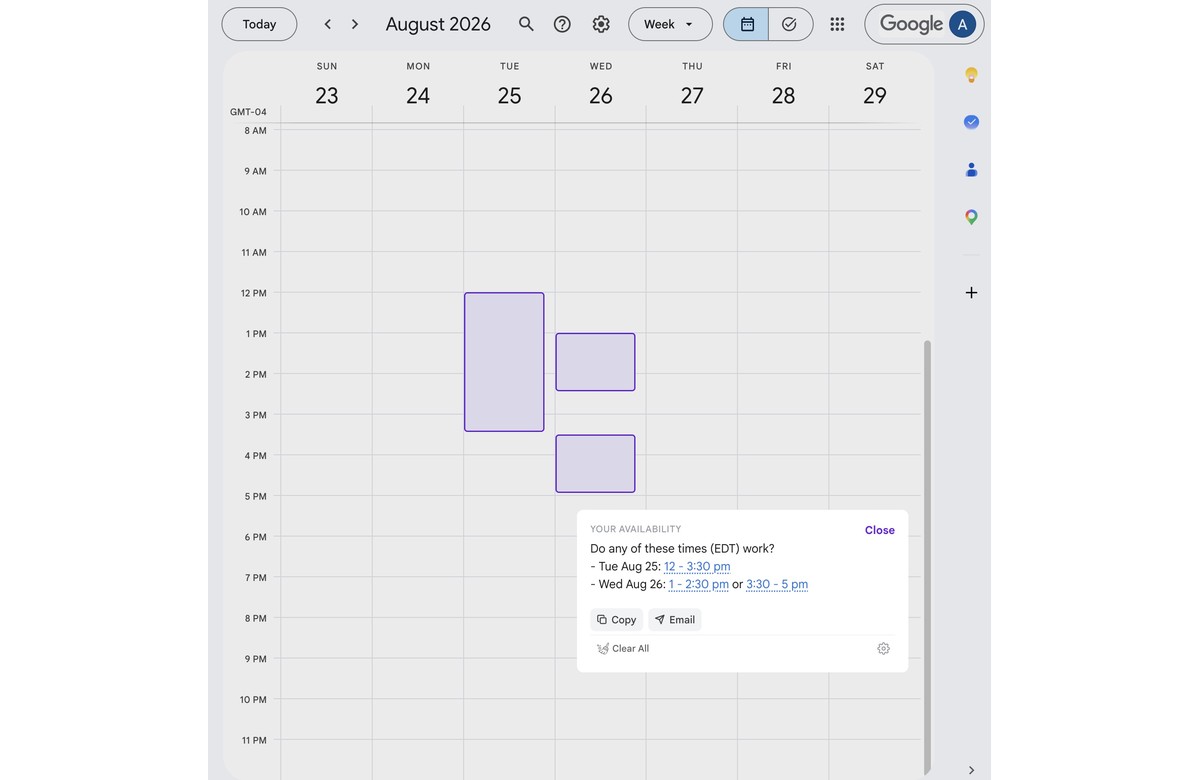
Selected slots become plain, readable text. The gear icon at the bottom right of the panel opens Settings.
Turn on Hold if you want Offer Times to place placeholder events on your own calendar for the slots you just offered, so the time isn’t double-booked while you wait for a reply. Holds need your calendar connected; the first time you use one, a Google permission screen appears.
Taking bookings
A booking link is optional. When it’s on, each set of times you send also gets its own link, and you get a personal page at offer-times.com/yourname.
- Open the Offer Times panel and click the gear icon to open Settings.
- Choose Bookable times in the left-hand list.
- Turn on Make my times bookable.
- Connect the calendar that invites should be sent from, set your Link name, your name, and a default duration.
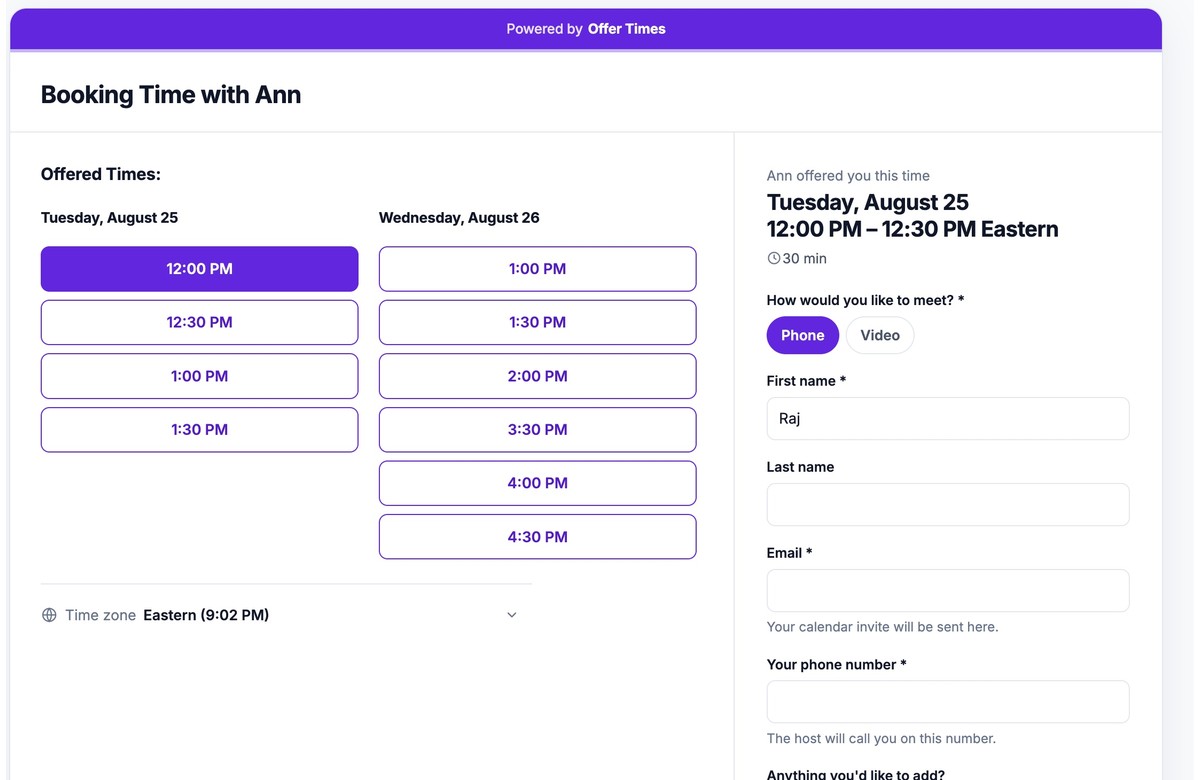
What a guest sees. They pick a time, choose how to meet, and get a calendar invite by email.
When a booking comes in and your calendar is connected, Offer Times creates the invite and emails it to the guest. If your calendar isn’t connected, the booking waits in the panel as a request until you press Confirm.
Meeting channels
Meeting channels decide how people can book you. Under Settings › Bookable times › Meeting channels you can turn on any combination of:
- In person — guests come to an address you provide.
- Phone — the guest gives a phone number when booking.
- Video — a meeting link is added to the calendar invite automatically.
If Video is on, pick one video option: Google Meet, Zoom, or Other (a link you paste yourself, which works with Microsoft Teams, Webex, Whereby and anything else). Only one video option can be selected at a time, and Zoom only becomes selectable once you’ve connected your Zoom account.
Zoom integration
Connecting Zoom lets Offer Times create a Zoom meeting on your own Zoom account whenever someone books a video meeting with you, and put that join link on the calendar invite the guest receives. You never have to copy a link across by hand.
What the integration does — and doesn’t
Offer Times only ever creates meetings on your account and reads back the join URL. It does not join meetings, record them, or read their content. It has no access to your Zoom recordings, chat, participants, contacts, or any meeting you didn’t book through Offer Times.
Permissions Zoom will ask you to approve
-
Create a meeting —
meeting:write:meetingCreates the Zoom meeting for a confirmed booking and reads back its join link. -
View a user —
user:read:userReads the email address of the Zoom account you connected, so the settings tile can show you which account links are being created on. Used for display only.
Before you start
- The Offer Times extension is installed and you are signed in (see Install and sign in).
- Google Calendar is connected in Offer Times. Zoom mints the meeting link; the calendar event is what carries that link to your guest, so a fully automatic Zoom booking needs both. Without a connected calendar, Zoom bookings still work — they simply wait as a request until you confirm them in the extension.
- You can sign in to the Zoom account the meetings should be created on.
Adding the app
- Open Google Calendar and click the Offer times button in the bottom right.
- Click the gear icon in the panel to open Settings, then choose Bookable times.
- Make sure Make my times bookable is on, and that Video is switched on under Meeting channels.
- On the Zoom tile, click Connect. A new tab opens on Zoom.
- Sign in to Zoom if you’re asked to, review the permissions listed above, and click Allow.
- Zoom sends you back to
offer-times.com/oauth/zoom/callback, which finishes the connection. That tab closes on its own and returns you to your calendar. - The Zoom tile now reads Connected with the email address of the Zoom account you approved. Click the tile once to make Zoom your selected video option — the tile shows Selected when it is.
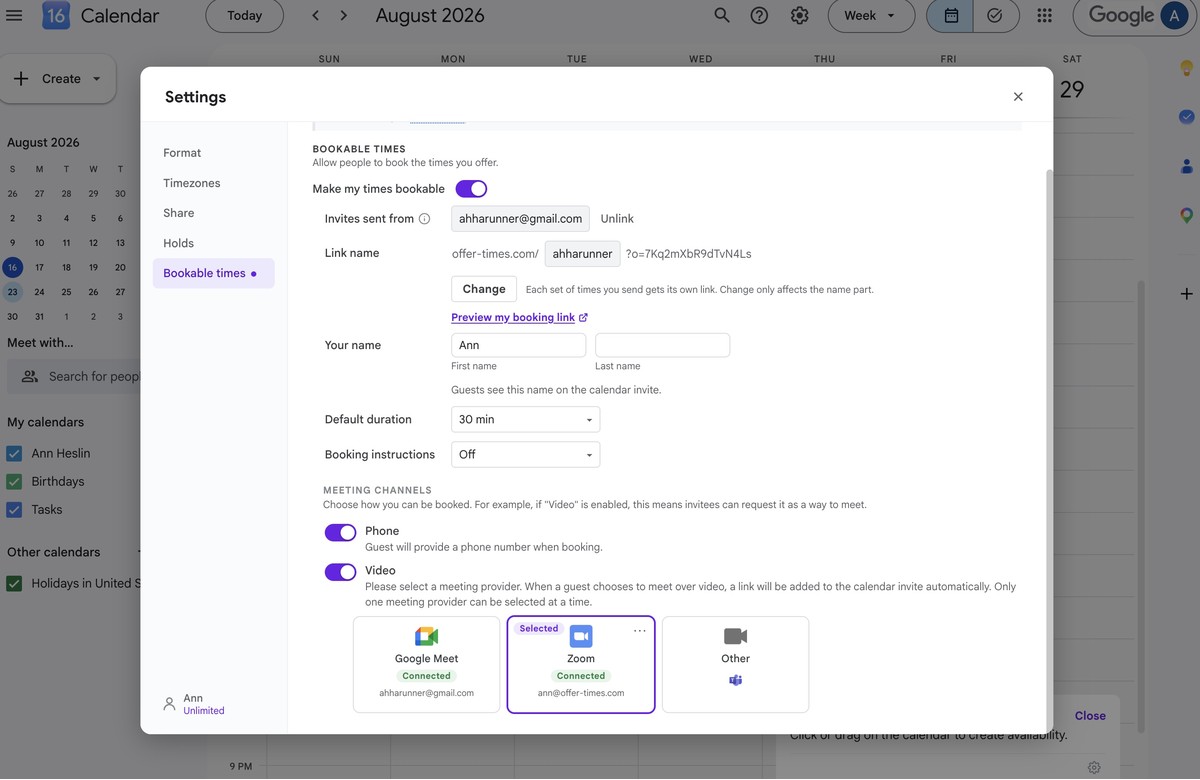
Settings › Bookable times, with Zoom connected and selected as the video option.
Your Zoom account, not ours. Every meeting is created on the Zoom account you authorized, using your own Zoom plan — including its meeting length limits. Offer Times never hosts the meeting.
Using the app
Once Zoom is connected and selected, it works on its own:
- Offer times as usual, or share your booking link.
- Your guest opens the link, picks a time, and chooses Video as the way to meet.
- Offer Times creates a Zoom meeting on your account for that time and duration.
- The Zoom join link is written into the calendar invite, which is emailed to your guest. Both of you see the same link on the event.
Confirming a booking by hand. If a booking is waiting as a request in the panel — which happens when your calendar isn’t connected — the Zoom link is created at the moment you press Confirm, and goes onto the event Offer Times creates then.
Changing your video option. Click any other tile (Google Meet, or Other with your own pasted link) to switch. Zoom stays connected; new bookings simply stop using it. Only one video option is active at a time.
Using more than one Zoom account. Only one Zoom account can be connected at a time. To switch, disconnect the current one and connect again while signed in to the account you want.
What Offer Times stores
- An encrypted Zoom refresh token So links can be created for future bookings without asking you to sign in again. Stored encrypted and never shown anywhere in the product.
- Your Zoom account identifier and login email Shown on the settings tile so you can tell which account is connected.
- The join link for each meeting it created Kept on that booking record so the invite, the reminder email and the calendar event all point at the same meeting.
Nothing else from your Zoom account is requested, received or stored. See the privacy policy for how Offer Times handles data generally.
Troubleshooting
- The Zoom tile says “Not available yet” or won’t respond Check that you’re signed in to Offer Times, that Make my times bookable is on, and that the Video channel is switched on. The Zoom tile is inactive until all three are true.
- Clicking Connect didn’t open a Zoom tab A pop-up blocker or a second Chrome profile can swallow the tab. Close any Zoom tab that did open and press Connect again.
- You approved on Zoom, but the tile still says “Not Connected” Press Connect once more. The connection is only finished when the tile shows your Zoom email, so a second attempt is safe and won’t create a duplicate.
- The tile shows the wrong Zoom account Disconnect it (below), sign in to the Zoom account you want in the same browser, then connect again.
- A booking came through with no Zoom link Check that the Zoom tile still reads Connected and is the Selected video option, and that your Google Calendar is still connected. If Zoom access was revoked — a password change, or an admin removing the app — the tile drops back to Not Connected and reconnecting fixes it. Bookings already made are not retroactively updated; add a link to the event by hand, or decline and re-offer the time.
- Guests can’t choose video at all The Video channel has to be on and one video option selected. If no option is selected, guests only see the other channels you’ve enabled.
- Still stuck Write to us from the feedback page — a real person reads every message, usually within one business day.
Removing the app
There are two ways to remove the Zoom integration. Either one ends Offer Times’ access to your Zoom account; doing both is fine and changes nothing extra.
Option 1 — Disconnect from inside Offer Times
- Open the Offer Times panel and click the gear icon to open Settings.
- Choose Bookable times and find the Zoom tile under Meeting channels.
- Click the … (more actions) button on the tile.
- Choose Disconnect, then confirm.
Offer Times revokes its access with Zoom and deletes the stored token immediately. The tile returns to Not Connected.
Option 2 — Remove the app from the Zoom App Marketplace
- Sign in at marketplace.zoom.us.
- Open My Library in the bottom left.
- Find Offer Times in the list.
- In the Actions column, click the … icon and choose Remove.
- Optionally pick a reason in the Remove App window, then click Remove to confirm.
You can do the same from the Zoom Workplace desktop app: Marketplace › My Library, then the same … › Remove.
What happens when you remove it
- New bookings stop getting a Zoom link. Guests who choose video will get whichever other video option you select, and if none is selected they won’t be offered video at all. It’s worth picking another option or turning off the Video channel so guests aren’t left without a way to meet.
- Meetings already created stay in your Zoom account. Removing the app does not cancel or delete them, and calendar invites already sent keep working normally.
- Your stored credentials are deleted. Offer Times revokes the token with Zoom and removes it from its database, along with the connected Zoom account identifier and email address. Nothing is kept in a recoverable form and there is no retention window.
- Join links on past bookings remain on those records, because they are part of the calendar events and confirmation emails already sent. If you want one removed as well, ask us on the feedback page.
- Everything else is untouched. Your Offer Times account, your booking link, your booking history and your Google Calendar connection all keep working exactly as before.
- Reconnecting is a fresh authorization. Click Connect on the Zoom tile again and approve the same permissions; there is no penalty or waiting period.
Removing Offer Times
To remove the extension itself, open chrome://extensions (or about:addons in Firefox), find Offer Times and choose Remove.
Removing the extension stops Offer Times running in your browser. If you also want your account and data deleted, or you want to revoke calendar access separately, tell us on the feedback page and we’ll take care of it. Google Calendar access can also be revoked at any time from your Google account permissions page.
Support
Questions, problems and feature ideas all go to the same place: the feedback page. Messages are read by a person, normally within one business day, Monday to Friday.
The FAQ covers the questions that come up most often — a missing button, sign-in trouble, Outlook support, and pricing.
Last updated 19 August 2026.